R tips&tricks
Appendable saving in R
One of the most crucial problems in HPC is that every error you make have much greater impact than in the normal computing — there is nothing more amusing than finding out that few-day simulation broke few minutes before the end because of an unfortunate value thrown by a random generator, typo in result saving code or just a cluster failure and its result are dissolving abandoned in RAM. Even if all goes OK, often it would be quite nice to have some insight inside the results before the job is completed.
Of course there is a trivial solution to this — frequent saving of preliminary results. Unfortunately this is easier say than done, basically because R’s save cannot append new object to the same file — thus I used to end up either with few giant text files which were somewhere in between something human readable and easily parsable or with a plethora of small RDatas which on the other hand required writing nontrivial script to be reintegrated in something usable (not to mention fuse-ssh freezes and crashes).
To this end I have come up with writing R package intended to expand save with appending; thus rtape was born. How does it work? You simply call
R> rtapeAdd(some_object_worth_saving,"myTape.rtape")
and your first tape appears in the working dir; following rtapeAdds will further populate the file with more objects not removing the previously stored. You can then load the entire stuff with rtapeAsList:
R> rtapeAsList("myTape.rtape")
[[1]]
 some_object_worth_saving
[[2]]
 some_object_worth_saving2
    ...
Note that there is no initialization or finalization step — yup, there is no header which makes the tape format simple (for instance you can just cat several files into one, not using R at all) and always ready to use, unfortunately also invalidates any attempt to make it random-readable or mutable in any other way than append / delete all. Though this is not something you expect from a failsafe data dump, do you? Ok, not counting situations when this dump has grown too big to be easily manipulated in the memory; hopefully rtape can also map a function to each tape object storing only current one in the memory, with a help of rtapeLapply and rtape_apply functions. Finally there is also some confidence stuff.
Oh, and rtapeAdd is not (yet) thread-safe — you have been warned (-;
Using Deducer to work with R
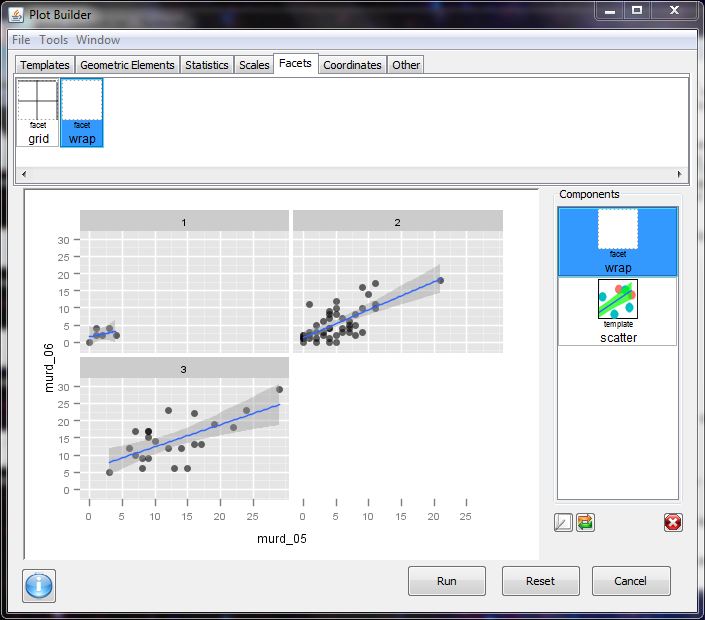
If one checks out the initial question that prompted this series, a common theme in the answers is that one should use the GUI as a tool to help one build code (and not just as a crutch to do the analysis). Being able to view the code produced by the GUI should help beginner R users learn the commands (and facilitate scripting analysis in the future). The following blog post highlights one of the popular GUI extensions to R, the Deducer package, and my initial impressions of the package.
It is obvious the makers of the Deducer package have spent an incredible amount of time creating a front end GUI to build plots using the popular ggplot2 package. While it has other capabilities, it is probably worth checking out for this feature alone (although it appears R-Commander recently added similar capabilities as well).
Installation: Long story short, on my Windows 7 laptop I was able to install Deducer once I updated to the latest version of R (2.13 as of writing this post), and installed some missing Java dependencies. After that all was well, and installing Deducer is no different than installing any other package.
What does Deducer do? Deducer adds GUI functionality to accomplish the following tasks:
- load in data from various formats (csv, SPSS, etc.)
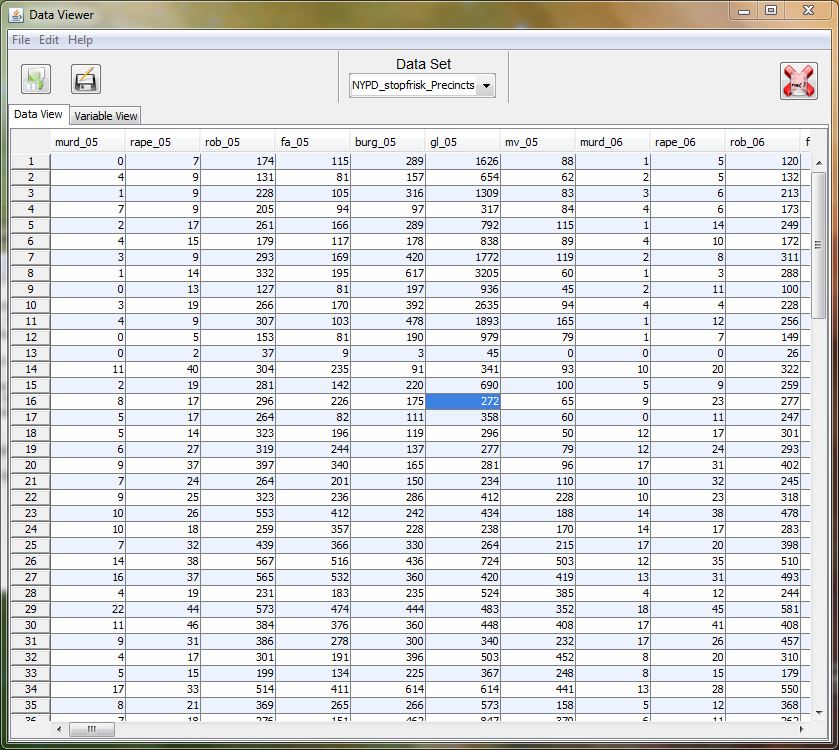
- view data + variable types in separate data viewer
- conduct data transformations (recode, edit factors, transformations, transpose, merge)
- statistical analysis (mean differences, contingency tables, regression analysis)
- A GUI for building plots using the ggplot2 package
Things I really like:
- data viewer (with views for spreadsheet and variable view)
- ability to import data from various formats
- regression model explorer
- interactive building of plots (the ability to update currently built plots is pretty awesome)
Minor Quibbles:
- I would like all of the commands to open in their own call window, not just plots (or be able to route commands to an open (or defined script window) ala log files.
- I am unable to use the console window if another deducer window is open (e.g. data view, regression model explorer).
Overall I’m glad I checked out the package. I suspect I will be typing library(Deducer) in the future when I am trying to make some plots with the ggplot2 package. The maintainers of the package did a nice job with including a set of commands that are essential for data analysis, along with an extensive set of online tutorials and a forum for help with the software. While the code Deducer produces by point and click is not always the greatest for learning the R language, it is a start in the right direction for those wishing to learn R.

CrossValidated blog is on R-bloggers.com from now on
Some may have already noticed that the last post appeared on the R-bloggers.com, but here now is the official announcement. R-bloggers.com aggregates blogs which write about R. Since questions about R constitute roughly 20% of all the questions on CrossValidated, it is natural that the community blog of CrossValidated writes about R too. We have a separate category on the blog dedicated to R and all the blogs in this category will appear on R-bloggers in the future. Here is the list of our R related posts so far:
For those who do not know us yet, we are the community of CrossValidated the site for statisticians, data miners, and anyone else doing data analysis or interested in it as a discipline. This site is a part of StackExchange.com network.
Using OpenMP-ized C code with R
What is OpenMP? Basically a standard compiler extension allowing one to easily distribute calculations over multiple processors in a shared-memory manner (this is especially important when dealing with large data — simple separate-process approach usually requires as many copies of the working data as there are threads, and this may easily be an overkill even in overall size, not to mention the time wasted for copying).
The magic of OpenMP is that once you have a C or Fortran code, in most cases you need nothing more than a few additional compiler flags — thus the code remains as portable and as readable as before the modification. And is usually just nice and simple, not counting few common parallelism traps and some quirks related to the fact we want it to work with R.
In this post I don’t want to make an OMP tutorial (the web is full of them), rather show how to use it with R. Thus, I’ll use a toy example: a function that calculates the cumulative sum in an unnecessary demanding way:
 #include <R.h>
 #include <Rinternals.h>
 SEXP dumbCumsum(SEXP a){
  SEXP ans;
  PROTECT(a=coerceVector(a,REALSXP));
  PROTECT(ans=allocVector(REALSXP,length(a)));
  double* Ans=REAL(ans);
  double* A=REAL(a);
  for(int e=0;e<length(a);e++){
   Ans[e]=0.;
   for(int ee=0;ee<e+1;ee++)
    Ans[e]+=A[ee];
  }
  UNPROTECT(2);
  return(ans);
 }
There is only one for loop responsible for most computational time and no race conditions, thus the OMP-ized version will look like this:
 #include <R.h>
 #include <Rinternals.h>
 #include <omp.h>
 SEXP dumbCumsum(SEXP a){
  SEXP ans;
  PROTECT(a=coerceVector(a,REALSXP));
  PROTECT(ans=allocVector(REALSXP,length(a)));
  double* Ans=REAL(ans);
  double* A=REAL(a);
  #pragma omp parallel for
  for(int e=0;e<length(a);e++){
   Ans[e]=0.;
   for(int ee=0;ee<e+1;ee++)
    Ans[e]+=A[ee];
  }
  UNPROTECT(2);
  return(ans);
 }
Time for R-specific improvements; first of all, it is good to give the user an option to select number of cores to use (for instance he has 16 cores and want to use first 8 for one job and next 8 for something else — without such option he would have to stick to sequential execution); yet it is also nice to have some simple option to use the full capabilities of the system. To this end we will give our function an appropriate argument and use OMP functions to comply with it:
 #include <R.h>
 #include <Rinternals.h>
 #include <omp.h>
 SEXP dumbCumsum(SEXP a,SEXP reqCores){
  //Set the number of threads
  PROTECT(reqCores=coerceVector(reqCores,INTSXP));
  int useCores=INTEGER(reqCores)[0];
  int haveCores=omp_get_num_procs();
  if(useCores<=0 || useCores>haveCores) useCores=haveCores;
  omp_set_num_threads(useCores);
  //Do the job
  SEXP ans;
  PROTECT(a=coerceVector(a,REALSXP));
  PROTECT(ans=allocVector(REALSXP,length(a)));
  double* Ans=REAL(ans);
  double* A=REAL(a);
  #pragma omp parallel for
  for(int e=0;e<length(a);e++){
   Ans[e]=0.;
   for(int ee=0;ee<e+1;ee++)
    Ans[e]+=A[ee];
  }
  UNPROTECT(3);
  return(ans);
 }
This code will also ensure that the number of threads won’t be larger than the number of physical cores; doing this gives no speedup and comes with a performance loss caused by OS scheduler.
Finally, time to resolve small quirk — R has some code to guard the C call stack from overflows, which is obviously not thread-aware and thus have a tendency to panic and screw the whole R session up when running parallel code. To this end we need to disable it using the trick featured in R-ext. First, we include Rinterface to have an access to the variable with stack limit
 #define CSTACK_DEFNS 7
 #include "Rinterface.h"
and then set it to almost infinity in the code
R_CStackLimit=(uintptr_t)-1;
Voilà, the stack is now unprotected — the work with R just become a bit more dangerous, but we can run parallel stuff without strange problems. The full code looks like this:
 #include <R.h>
 #include <Rinternals.h>
 #include <omp.h>
 #define CSTACK_DEFNS 7
 #include "Rinterface.h"
 SEXP dumbCumsum(SEXP a,SEXP reqCores){
  R_CStackLimit=(uintptr_t)-1;
  //Set the number of threads
  PROTECT(reqCores=coerceVector(reqCores,INTSXP));
  int useCores=INTEGER(reqCores)[0];
  int haveCores=omp_get_num_procs();
  if(useCores<=0 || useCores>haveCores) useCores=haveCores;
  omp_set_num_threads(useCores);
  //Do the job
  SEXP ans;
  PROTECT(a=coerceVector(a,REALSXP));
  PROTECT(ans=allocVector(REALSXP,length(a)));
  double* Ans=REAL(ans);
  double* A=REAL(a);
  #pragma omp parallel for
  for(int e=0;e<length(a);e++){
   Ans[e]=0.;
   for(int ee=0;ee<e+1;ee++)
    Ans[e]+=A[ee];
  }
  UNPROTECT(3);
  return(ans);
 }
Now, time to make sure that R will compile our function with OMP support (and thus make it parallel). To this end, we create a Makevars file (in the src in case of package and in code directory when using dangling object files) with a following contents (for GCC):
 PKG_CFLAGS=-fopenmp
 PKG_LIBS=-lgomp
The first line will trigger parsing OMP pragmas, the latter will link the OMP library with omp_* functions.
We are ready to test our example:
 $ R CMD SHLIB omp_sample.c
 $ R
 > dyn.load('omp_sample.so')
 > .Call('dumbCumsum',runif(100000),0L)
Try to run sum system monitor (like htop or GUI one that comes with your desktop environment) and watch your powerful CPU being finally fully utilized (-;
To close with an optimistic aspect, few words about limitations. Don’t even try to run any R code or use features like random number generation or Ralloc inside parallelized blocks — R engine is not thread-safe and thus this will end in a more or less spectacular failure.
Plus of course all issues of parallel programming and OMP itself also apply — but that is a different story.
Using Emacs to work with R
A simple yet efficient way to work with R consists in writing R code with your favorite text editor and sending it to the R console. This allows to build efficient R code in an incremental fashion. A good editor might even provide syntax highlighting, parenthesis matching, and a way to send a selected portion of code to R directly. That may appear a crude way of working with R, especially for those used to statistical packages featuring a spreadsheet-view of the data and a lot of menus and buttons with which the user can interact. However, R is a statistical language and offers a lot more interactivity, though that might hardly be reduced in a series of click and go actions. So, basically, let’s keep it simple and just use an R-aware text editor.
Well, install Emacs if it is not already present on your system, and you’re almost done. Emacs is a powerful tool (it’s difficult to say it is just an editor) for programmers and users dealing with text file. It offers a lot of functionalities and will be suitable for the basic copy/paste activity described above. But, wait. There is more to see with the ESS package. Now, you will have access to a lot of R-specific functionalities, including syntax highlighting, auto-indentation of code, line-by-line evaluation, etc. and you won’t have to open an external R console: everything can be done from within Emacs.
A nice overview of Emacs capabilities has been given by Dirk Eddelbuettel in his answer to the following question on SO.
In the following we will describe one possible way of working with ESS. This will be oriented towards users which have minimal experience with Emacs. First, you will need to learn how to perform basic text operations with Emacs. Since Emacs is very sophisticated, finding out how to simply select text and copy might be a challenge. So invest some time in finding out how to do that efficiently. Reading the manual might help. For Mac OS X, you can use Aquamacs which supports native shortcuts, among other things.
Working with ESS does not differ from working with R. The same rules for organizing code should apply. We suggest using a separate directory for every project, which resides in a parent directory called for example R, which resides in some directory which is easily accessible. For Unix type OS (Linux and Mac OS X) this would be your home directory. For Windows, I recommend to point Emacs home directory to the directory where all your source resides, this might involve setting some environmental variables for older versions of Windows.
As you see the initial investment might seem a bit daunting. But do not worry, the rewards as with R are great.
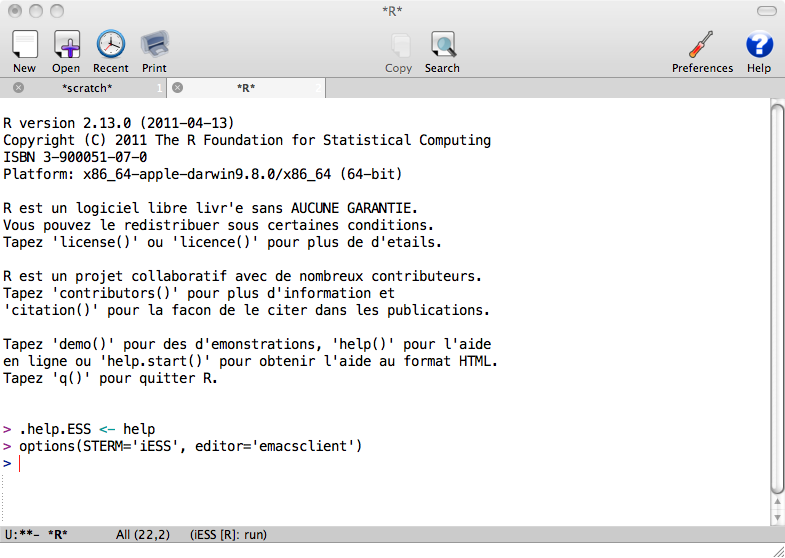
To start ESS simply start Emacs and press M-x R. You should see something like that:
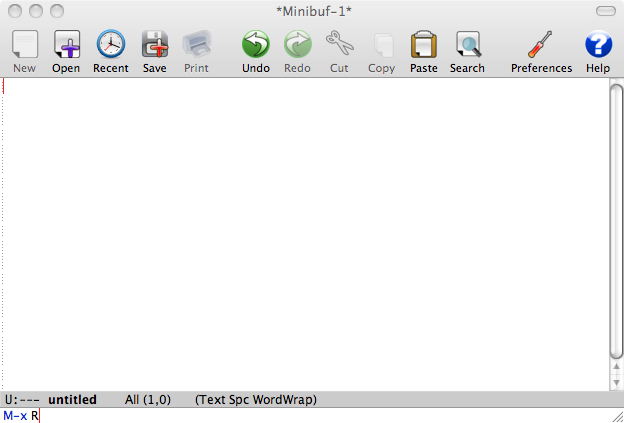
This how Emacs window looks on Mac OS X using Aquamacs Emacs distribution. You should see something similar with other Emacs distributions. One of the defining features of Emacs is its mini-buffer. It is the line at the bottom of the window, which contains the line M-x R. Every shortcut you press is reflected in this mini-buffer. If Emacs is stuck and does not respond look at the mini-buffer first, chances are that you inadvertently used some keyboard shortcut to invoke some Emacs command and now it is waiting for your further input. The way to get out of this is to quit the current command in the mini-buffer using the shortcut C-g. This will probably be the most used shortcut for first time Emacs users.
After pressing M-x R press enter. You should get the following prompt:
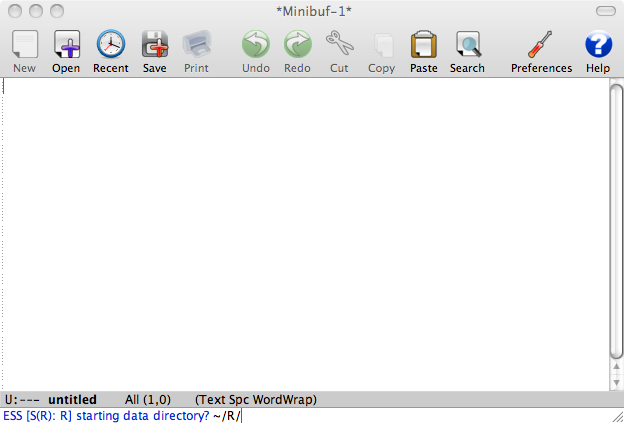
Select the directory (you can use Tab to complete long directory names) and press Enter. What you get is similar to usual R prompt:
The improvement on the usual prompt is that it is also simple text file containing everything R produced. So for example you can scroll to your previous command and put the cursor on it, press Enter and it will be reproduced.
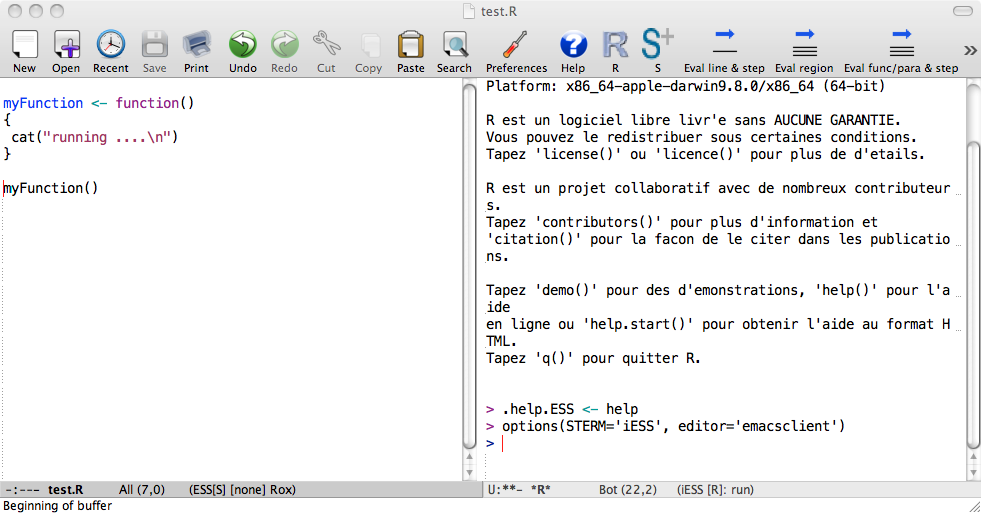
After starting R process, we suggest dividing emacs in two windows (Emacs terminology). Then on the left you can have a source code, which will be sent to the R process on the right. The relevant shortcuts are C-x 3 for splitting windows vertically, C-x 1 for making the current buffer the only window and C-x 2 for splitting windows horizontally. Here is how it looks after C-x 3:
When sending code to R, it is advisable to keep distinction between functions and R statements. You can do this by keeping all your functions in one file called 10code.R for example. Then you can simply load this file using load ESS file option (shortcut C-c C-l). The advantage of this approach is that it sources all the functions and produces nothing in the R buffer. If there is an error in your code then ESS shows a message in the minibuffer and you can investigate it by pressing C-c `.
The other pieces of code are R statements, which should be kept self-explanatory: load data, clean data, fit statistical model, inspect the results, produce the final results. The source code for these statements should be the current status of the project. The intention is that after your project is finished, sourcing those source files should allow to reproduce the entire project. You can use git or other CVS for tracking history, since Emacs has good support for working with them.
When working with R files, you can work with one R statement at a time, which you send to the R process via the “Eval function, paragraph, statement” command, aka C-c C-c. This command sends the paragraph to the active R process, i.e. the text which is delimited by new lines. This is handy since you can group R statements into tasks, and send whole task to the R process. It also does not require selecting text, which is also very convenient. The shortcut C-c C-c has the advantage that it moves the cursor to R window, so you can immediately inspect R output.
In sum, the basic workflow for working with R and ESS is moving a lot between windows and buffers. To facilitate this you can use the following shortcuts, which should be put in your .emacs file:
(define-key global-map [f1] 'Control-X-prefix)
(define-key global-map [f3] 'find-file)
(define-key global-map [f2] 'save-buffer)
(define-key global-map [f8] 'kill-buffer)
(define-key global-map [f5] 'switch-to-buffer)
(define-key global-map [f6] 'other-window)
(define-key global-map [f9] 'ess-load-file)
Other specific ESS settings you can use are the following:
(setq comint-input-ring-size 1000)
(setq ess-indent-level 4)
(setq ess-arg-function-offset 4)
(setq ess-else-offset 4)
This tells ESS to make the tab 4 characters wide (the default is 2), which is a personal preference for some, and expands the number of your issued commands ESS saved in the history.
For working with R process directly, the following shortcuts can be very useful:
(add-hook 'inferior-ess-mode-hook
    '(lambda nil
          (define-key inferior-ess-mode-map [\C-up]
              'comint-previous-matching-input-from-input)
          (define-key inferior-ess-mode-map [\C-down]
              'comint-next-matching-input-from-input)
          (define-key inferior-ess-mode-map [\C-x \t]
              'comint-dynamic-complete-filename)
     )
 )
This recalls the R statement from your R statement history, but it tries to match it with the one which is already on your line. So, for example, typing pl in R process and pressing \C-up (that’s control and the up arrow) will cycle through all the statements which start with pl, so it will recall for example all the plot(... commands.
Another setting which you might find useful is:
(setq ess-ask-about-transfile t)
This way ESS always asks where to save the text in the buffer with R process. You can number these files according to date, so you will always have another way to track what exactly you were doing. The only caveat of this option is that for some reason ESS sets the R buffer to read only, after loading the R. The shortcut for making buffer writable is C-x C-q.
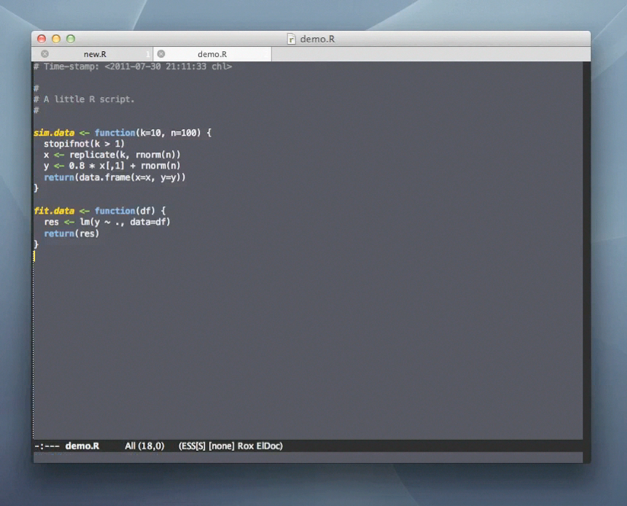
So this is one way of working with ESS and R. Other ways are possible, Emacs and ESS are very customizable, so you can set it the way you like it. You will soon learn than using Emacs to interact with R overcome the limitations raised by using different task-oriented tools while allowing you to document and version your code, Sweave or TeXify R output in an easy way. The following screencast shows a live Emacs session where the use of R is interleaved with various Emacs tools.
Two-way CRAN
Sooner on later, every useR will manage to exhaust R’s built-in capabilities and land on CRAN looking for his dreamed needle in a haystack of 3k+ contributed packages. Probably most of you already know stuff like Task Views or rseek which make finding something relevant a bit easier than digging the full list or googling, however all methods will eventually lead to a CRAN package page like this:
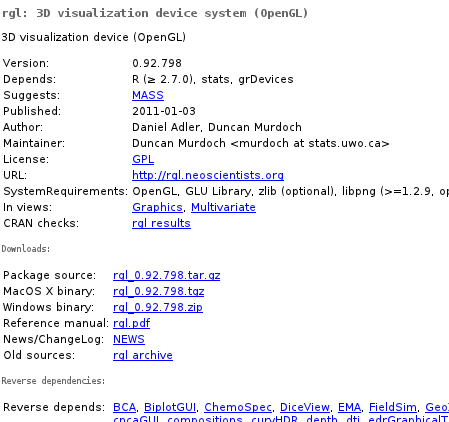
Sample CRAN package page
Ok, but what’s the problem? We have basic info here, sources, manuals, builds, dependencies… Well, let’s compare this to some modern application repositories like Android Market, Mozilla Add-ons or AppStore; we’ll immediately notice lack of any form of user feedback, neither as ratings nor reviews. And such stuff may be quite handy — imagine you have for instance found three packages doing certain thing; surely one of them will be fastest, one least bloated, one most functional and one will best integrate with the rest of your code, but you probably won’t be able to deduce this easily from manuals. Or you’ve found a package from 2003 and you don’t really want to check whether it is an abandoned code dependent on a bunch of obsolete quirks or just a solid code that just didn’t require any modifications. Or you have been using foozifier for years not knowing that bartools’ functionWithConfusingName does the same 50 times faster using 1/1000 of RAM. Or you just thought you can’t baz in R, yet the only problem was that the bazzing package author thought it was called wizzing.
Moreover, this is also useful for package authors — comment is much easier and more reusable way of leaving feedback than e-mail, so you can count on more reports and thus catch more bugs and gather more good feature ideas.
What’s worse with this story is that this is more-less already here; it is called Crantastic and works pretty well, not counting the fact that it would certainly benefit from some more traffic — so, go there and check if you are registered user of all packages you’ve installed and start contributing; it really comes back!